How to Write a Blog Post
You have an idea for a blog post. Maybe it came to you in the shower, maybe you saw a question in a Facebook group, maybe it’s just something you know would help your readers.
And then you open a blank document and… nothing.
If this sounds familiar, you’re in good company. Most bloggers don’t struggle with having ideas about what to write. They struggle with knowing what to do with those ideas.
In this blog post I will walk you through the whole process, from your initial idea all the way to a finished draft ready to go live.
Brainstorm Your Idea
To make this easier to follow, we’re going to use a real example throughout this post. Meet Sarah the travel blogger. She runs a travel blog and her niche is budget travel. She wants to write a post about packing light for a weekend trip. She has the idea, but she doesn’t know where to start.
Her first step is to brainstorm.
Brainstorming is just getting everything out of your head and onto the page before you start organizing anything. For Sarah, that means jotting down everything she knows about packing light, questions her readers might have, things she’s learned from her own trips, mistakes she’s made, gear she swears by.
You can brainstorm however works for you. A notes app, a piece of paper, a voice memo while you’re driving. In this step you don’t want to write your post yet, it’s just to empty your brain so you have something to work with.
If you’re stuck, ask yourself: what does my reader need to know about this topic? What questions would they show up with? Start there.
Find Your Keyword
Once Sarah has her brainstormed idea, the next step is figuring out her keyword. As a beginning blogger, don’t worry about full keyword research right now.
Instead what I mean here by find your keyword is simply figuring out what someone might type into Google, Bing, or Pinterest to find your post.
For Sarah’s readers, that might be something like “how to pack light for a weekend trip” or “weekend trip packing tips.” This is what we’d consider a long tail keyword, and it’s very specific to exactly what someone would search for if they wanted to read a post on this topic.
This phrase becomes her keyword.
She’ll use it naturally throughout the post as she writes.
Pick Your Writing Tool
Before Sarah writes a single word, she needs somewhere to write. This sounds simple but it’s worth mentioning because a lot of new bloggers aren’t sure where they should actually be drafting their posts.
You have a few options:
- Google Docs — free, saves automatically, easy to share and access from anywhere. A lot of bloggers swear by this one.
- Microsoft Word — works great if you’re already comfortable with it and have it on your computer or a paid account.
- Directly in the WordPress post editor — you can draft right inside WordPress. Right now WordPress uses Gutenberg blocks, so the post editor will look and feel very similar to other word editors you may already be used to. You can format everything directly in the post as you write.
- Pen and paper — if you think better by hand, start there. You can always type it up after.
There’s no wrong answer here. The best writing tool is the one you’ll actually use consistently.
For Sarah, she opens up a Google Doc and she’s ready to go.
Outline Your Post First
Now that Sarah has her keyword and her writing tool open, it’s time to outline.
An outline is just a skeleton of your post. You’re not writing anything yet, you’re just mapping out what you want to cover and in what order.
Think of it as your roadmap before you start driving.
For Sarah’s post on how to pack light for a weekend trip, her outline might look something like this:
- Why you should pack light
- Common packing mistakes that make trips harder
- What to pack for a weekend trip
- How to choose the right bag for your trip
- What to leave at home
- Packing tips for flying
- Packing tips for driving
She’s not writing full sentences, she’s not filling anything in yet. She’s just deciding what she wants to cover. Once that’s mapped out, the writing becomes a lot easier because you already know exactly where you’re going.
Write Your Intro Last
Write your intro last! I know, this one surprises a lot of bloggers but it works.
Sarah doesn’t start writing at the top of her outline. She skips the intro for now and starts with her first real section.
Why?
Because the intro is easier to write once you know what you actually said. Trying to write it first means you’re introducing a post that doesn’t fully exist yet.
So Sarah starts with “why you should pack light” and works her way down. By the time she gets to the end of her draft, she knows exactly what her post is about, who it’s for, and what she wants her reader to feel when they land on it. Then she goes back and writes the intro.
It takes the pressure off and usually results in a much better opening.
Break Your Post Into Sections
Notice how Sarah’s outline is already broken into sections with headers?
That’s intentional. Blog readers don’t read posts the way you’d read a book.
They scan first, then decide what to read closely.
And headers make that possible! They break your post into digestible chunks and let your reader jump to the part that’s most relevant to them.
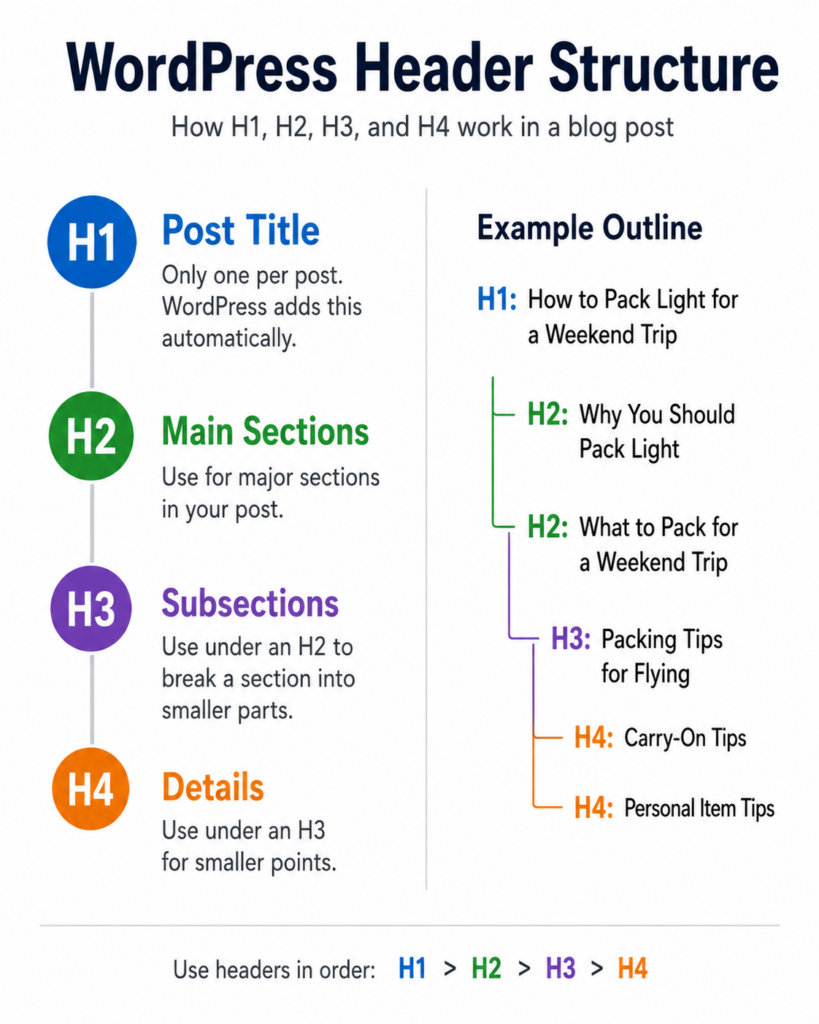
In WordPress, headers are organized by levels:
- H1 — this is your post title. There should only be one H1 per post and WordPress assigns it automatically.
- H2 — your main section headers. Each major topic in your post gets an H2. Sarah’s “Why you should pack light” and “What to pack for a weekend trip” are both H2s.
- H3 — a subsection under an H2. If Sarah wanted to break “Packing tips for flying” into carry on tips and personal item tips, those would be H3s.
Keep your paragraphs short too.
Two to three sentences is a good rhythm for blog writing. Big walls of text send readers straight to the back button.
We’ll go deeper on blog formatting in a related post, but for now just remember: headers, short paragraphs, and lots of white space make your post easier to read.
Write How You Talk
Writing how you talk is a big piece that separates blogs and their readers. You want to have a blog that is enjoyable to read from those that feel like a textbook reading experience.
In our example, Sarah isn’t writing a research paper.
She’s writing for real people who found her blog because they want practical help planning a trip. So she writes the way she’d explain it to a friend, casual, clear, and conversational.
That means short sentences. Contractions. The occasional “honestly” or “trust me on this one.” It means not trying to sound smarter than you are or more formal than the situation calls for. This might vary depending on your niche but find your style and voice when you write.
If you find yourself writing something that you would never actually say out loud, you likely want to rewrite it. Your readers came to your blog, not a Wikipedia article.
Let your personality show up on the page. A good tip here is to re-read your blog posts outloud before you hit publish so you can catch the flow and change up any parts that read weird.
The Outro
Sarah is almost done with her draft. She’s written every section in her outline and now she’s at the bottom of the post wondering how to wrap it up.
It’s pretty old school now (in 2026 as I write this blog post) to do a very formal conclusion that summarizes everything you just said. Your reader just read the whole post, they don’t need a recap. This used to be very common but most bloggers have moved away from this model.
What you do want is to leave them with something. A next step, a related post to read, a question to think about, or a call to action. Give them somewhere to go or something to do before they close the tab. What do you want them to do by the time they finish reading your blog post? This will inform what you put in your outro (if you need one at all).
For Sarah, she might end with a link to her free packing checklist, or point readers to her next post about budget travel essentials. Either way, she’s not just stopping mid-thought. She’s closing the loop.
Before You Finish Your Blog Post
You now have a full draft.
Before you call it done, do a quick pass to make sure everything is in order.
A few things to check:
- Read it out loud — if something sounds off when you say it, rewrite it. Your ear catches things your eyes miss.
- Proofread — spelling, grammar, anything that looks sloppy. A tool like Grammarly can help.
- Add your images — featured image and any visuals throughout the post.
- Internal links — are there other posts on your blog you can link to? Connect them here.
- Meta description — a short summary of your post that shows up in search results. Write one if you haven’t already.
Sarah runs through this same checklist every time before she considers a post finished. It takes maybe ten minutes and it’s worth it every single time.
Start Your First Blog Post
And that’s it.
Sarah went from a blank Google Doc to a finished blog post, and now you know exactly how to do the same thing.
The more you write, the faster this process gets. The outline starts to feel second nature. Your voice gets easier to find. The blank page stops being so intimidating.
If you want a shortcut, the Blog Writing Playbook has everything you need to write faster and skip the blank page entirely. It includes templates for every type of blog post so you always know exactly where to start.